avatar

目录
Nginx 学习笔记

Nginx 概述、安装

什么是 Nginx ?

$\qquad$Nginx 是一款轻量级的 Web 服务器/反向代理服务器及电子邮件(IMAP/POP3)代理服务器,在BSD-like 协议下发行。其特点是 占有内存少,并发能力强,事实上nginx的并发能力在同类型的网页服务器中表现较好,中国大陆使用nginx网站用户有:百度、京东、新浪、网易、腾讯、淘宝等。

Nginx 的应用场景

  1. Http 服务器。Nginx 是一个 HTTP 服务器,可以独立提供 HTTP 服务,也可以做静态网页服务器

  2. 虚拟主机。可以实现在一台服务器虚拟出多个网站,例如个人网站使用的虚拟主机

  3. 反向代理,负载均衡。当网站的访问量达到一定程度之后,单台服务器不能用户的请求时,需要用多台服务器集群,配合 Nginx 做反向代理。并且多台服务器可以平均分担负载,不会因为某台服务器负载高宕机,而某台服务器闲置的情况。

Nginx 在 Linux 下的安装

环境准备

  1. gcc 环境
shell
1
yum install gcc-c++
  1. 第三方的开发包 PCRE

$\qquad$PCRE(Perl Compatible Regular Expressions)是一个 Perl 库,包括 perl 兼容的正则表达式库。Nginx 的 http 模块使用 pcre 来解析正则表达式,所以需要在 linux 上安装 pcre库。

shell
1
yum install -y pcre pcre-devel

  1. zlib 库

$\qquad$zlib 库提供了很多种压缩和解压缩的方式,Nginx 使用 zlib 对 http 包的内容进行 gzip,所以需要在 linux 上安装 zlib 库。

shell
1
yum install -y zlib zlib-devel

  1. OpenSSL

$\qquad$OpenSSL 是一个强大的安全套接字层密码库,囊括主要的密码算法、常用的密钥和证书封装管理功能及 SSL 协议,并提供丰富的应用程序供测试或其它目的使用。Nginx 不仅支持 http 协议,还支持 https(即在 ssl 协议上传输 http),所以需要在 linux 安装 openssl 库。

shell
1
yum install -y openssl openssl-devel

下载、编译、安装 Nginx

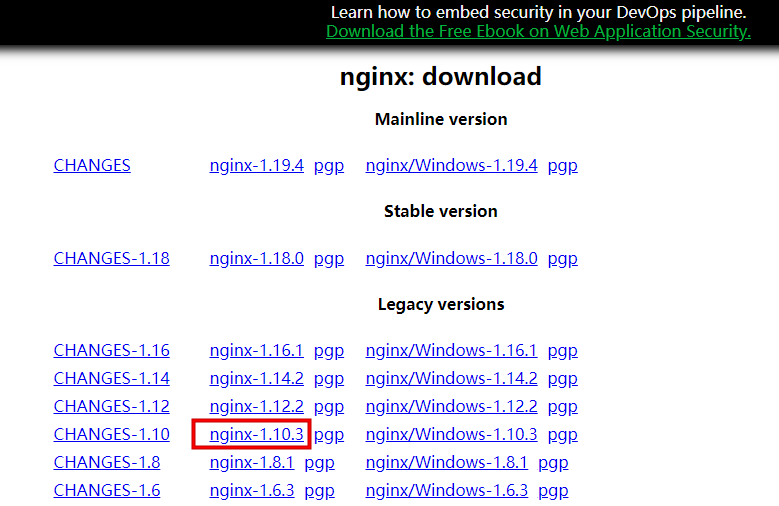
  1. 下载 Nginx

$\qquad$去官网中下载 Nginx 的压缩包:http://nginx.org/en/download.html

Nginx下载

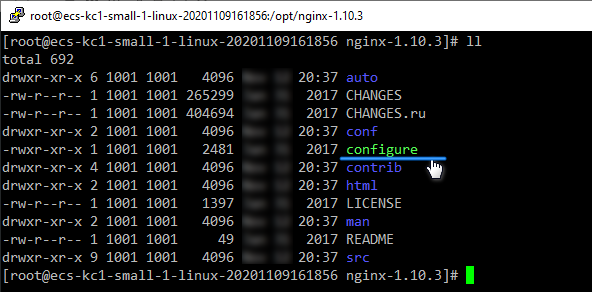
  1. 上传到服务器上,并解压缩
shell
1
tar -xzvf nginx-1.10.3.tar.gz

Nginx上传到服务器

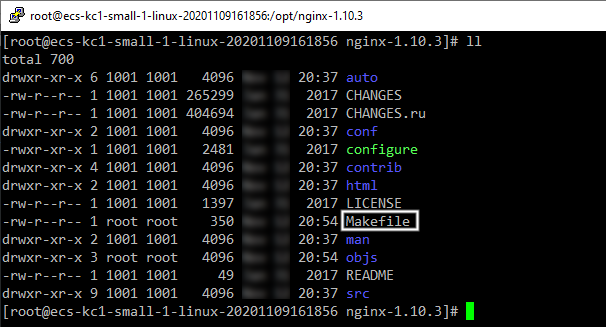
  1. 使用 configure 命令创建 makefile 文件

创建 makefile 文件

shell
1
2
3
4
5
6
7
8
9
10
11
12
./configure \
--prefix=[安装目录: /opt/nginx/] \
--pid-path=/var/run/nginx/nginx.pid \
--lock-path=/var/lock/nginx.lock \
--error-log-path=/var/log/nginx/error.log \
--http-log-path=/var/log/nginx/access.log \
--with-http_gzip_static_module \
--http-client-body-temp-path=/var/temp/nginx/client \
--http-proxy-temp-path=/var/temp/nginx/proxy \
--http-fastcgi-temp-path=/var/temp/nginx/fastcgi \
--http-uwsgi-temp-path=/var/temp/nginx/uwsgi \
--http-scgi-temp-path=/var/temp/nginx/scgi

创建 makefile 文件之结果

  1. 使用 make 命令编译、安装
shell
1
2
make # 编译
make install # 安装

Nginx的文件目录

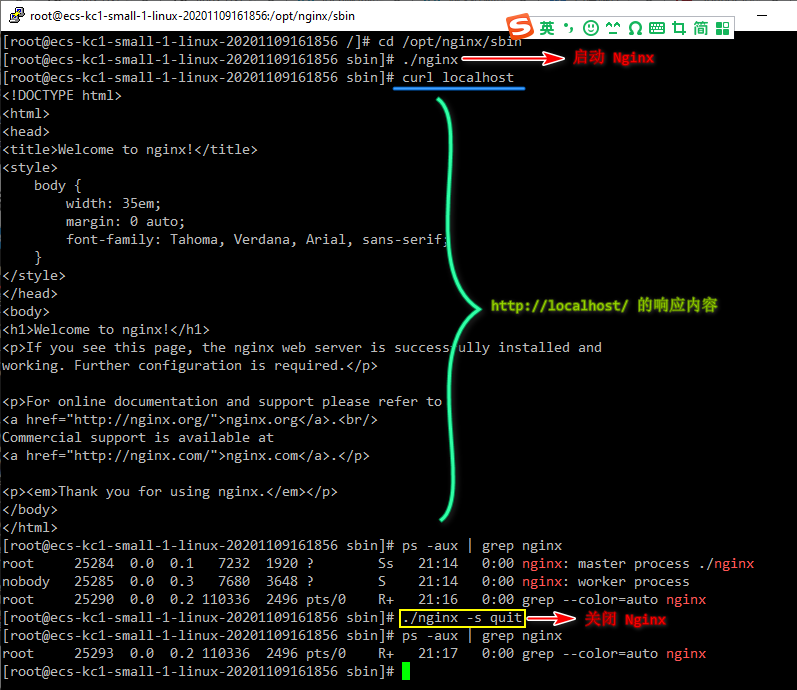
  1. Nginx 的启动与访问

注意:之前在执行 configure 命令时,指定的临时文件 /var/temp/nginx/client 还没有创建,需要先创建,否则会报错

shell
1
mkdir /var/temp/nginx/client -p
  • 启动、关闭 Nginx 的命令:
shell
1
2
3
4
5
6
cd /opt/nginx/sbin # 进入 Nginx 目录下的 sbin 目录

./nginx # 启动 Nginx
./nginx -s quit # 正常退出 Nginx(退出前保存配置)
./nginx -s stop # 强制退出 Nginx
./nginx -s reload # 刷新配置文件

Nginx的命令

Nginx 功能一:部署静态资源

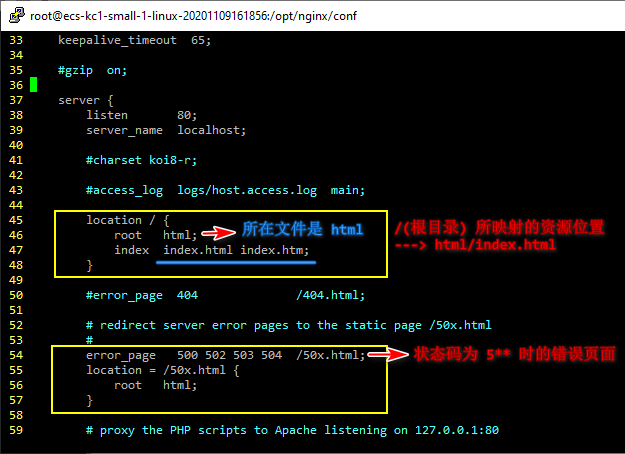
  • 先看一下 Nginx 的配置文件 conf/nginx.conf

Nginx的配置文件-部署静态资源

  • 所以要想引用静态资源,只需要将 html 文件夹下的 index.html 换成自己的就行了
  • 比如:换上自己的 404 页面

换上404页面
404-测试结果

Nginx 功能二:虚拟主机

$\qquad$在 nginx.conf 文件中,一个 server {} 就代表一个服务端:

Code
1
2
3
4
5
6
7
8
9
10
11
12
13
14
15
16
17
18
19
20
21
22
23
24
25
26
27
28
29
30
...
http {
include mime.types;
default_type application/octet-stream;

sendfile on;

keepalive_timeout 65;

# 服务端,可以多个配置(不同的端口、server_name)
server {
listen 80; # 端口号,默认 80
server_name localhost; # 域名或者 ip

location / { # 访问路径
root html; # 默认访问资源的目录
index index.html index.htm; # 默认访问资源名称
}

# 错误页面
error_page 404 /404.html;
error_page 500 502 503 504 /50x.html;

location = /50x.html { # 访问路径
root html;
}
}
...
}
...

端口绑定

  • 在 nginx.conf 中配置多个 server,每个 server 设置不同的端口,server_name 仍然配置成 localhost,再为每个 server 配置不同的静态资源内容,就可以实现访问不同的端口号,得到不同的资源
Code
1
2
3
4
5
6
7
8
9
10
11
12
13
14
15
16
17
18
19
20
21
22
23
24
25
26
27
28
29
30
31
32
33
34
35
36
37
# http://公网ip:80/ ---> html/index.html
server {
listen 80; # 端口号
server_name localhost; # 域名或者 ip

location / { # 访问路径
root html; # 默认访问资源的目录
index index.html index.htm; # 默认访问资源名称
}

# 错误页面
error_page 404 /404.html;
error_page 500 502 503 504 /50x.html;

location = /50x.html { # 访问路径
root html;
}
}

# http://公网ip:8088/ ---> bookstore/index.html
server {
listen 8088; # 端口号,默认 80
server_name localhost; # 域名或者 ip

location / { # 访问路径
root bookstore; # 默认访问资源的目录
index index.html index.htm; # 默认访问资源名称
}

# 错误页面
error_page 404 /404.html;
error_page 500 502 503 504 /50x.html;

location = /50x.html { # 访问路径
root bookstore;
}
}

域名绑定

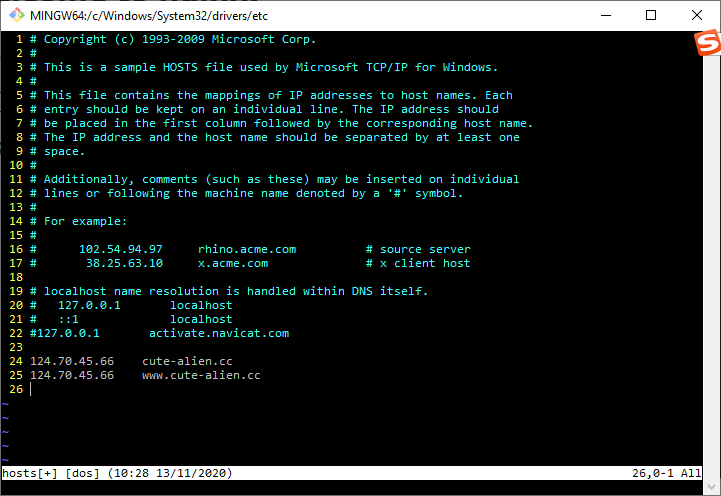
$\qquad$Windows 系统通过域名来访问网站时,首先从本地的 hosts 文件中查看有没有域名对应的 ip 地址,如果没有就会去 DNS 服务器找域名与 ip 地址的对应关系。

  1. 所以,先在 hosts(C:\Windows\System32\drivers\etc\hosts) 中添加一个域名与 ip 的映射

Win10 中修改 hosts 文件

  1. 然后,在 nginx.conf 中配置 server:
Code
1
2
3
4
5
6
7
8
9
10
11
12
13
14
15
16
17
18
19
20
21
22
23
24
25
26
27
28
29
30
31
32
33
34
35
36
37
38
39
# ========== use cute-alien.cc visit the web
# ========== shit! A problem happened, because it need to be signed.
# ========== We can only use the domain that is not existed.
server {
listen 80;
server_name cute-alien.cc;

location / {
root html;
index index.html index.htm;
}

error_page 404 /404.html;

error_page 500 502 503 504 /50x.html;
location = /50x.html {
root html;
}
}

# ========== use www.cute-alien.cc visit the web
# ========== shit! A problem happened, because it need to be signed.
# ========== We can only use the domain that is not existed.
server {
listen 80;
server_name www.cute-alien.cc;

location / {
root html;
index 404.html;
}

error_page 404 /404.html;

error_page 500 502 503 504 /50x.html;
location = /50x.html {
root html;
}
}
  1. 结果(临时效果):

注意:设置的域名需要备案,不然会被截断(如果服务器是中国内地的)

测试域名绑定-1
测试域名绑定-2

Nginx 功能三:反向代理与负载均衡

反向代理

介绍

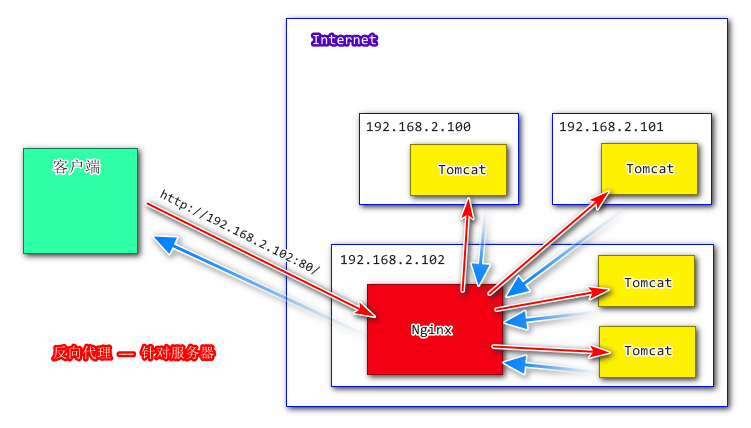
$\qquad$反向代理(Reverse Proxy)方式是指以代理服务器来接受 internet 上的连接请求,然后将请求转发给内部网络上的服务器,并将从服务器上得到的结果返回给 internet 上请求连接户端,此时代理服务器对就表现为一个反向代理服务器。

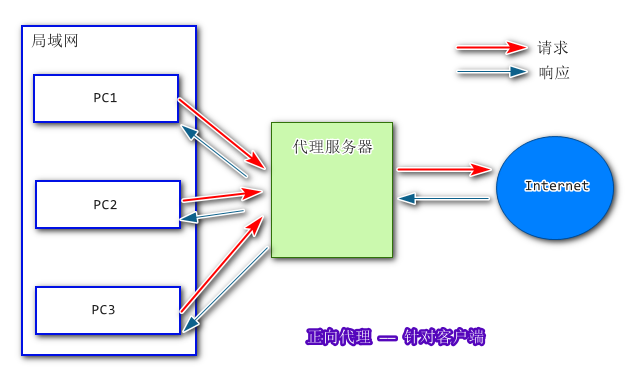
  • 正向代理:

正向代理

  • 反向代理:

反向代理

配置反向代理:

Code
1
2
3
4
5
6
7
8
9
10
11
12
13
14
15
16
17
18
19
20
21
# 第一步:配置上升流[狗头]
upstream tomcat-blog {
# server [ip]:[port];
server 192.168.2.100:80;
server 192.168.2.101:80;
server 192.168.2.102:8080;
server 192.168.2.102:8081;
}

server {
listen 80;

# server_name [访问的域名]/ip;
server_name cute-alien.cc;

location / {
# root html; # 默认访问资源的目录
proxy_pass http://tomcat-blog;
index index.html index.htm;
}
}

负载均衡

$\qquad$负载均衡建立在现有网络结构之上,它提供了一种廉价有效透明的方法,可以扩展网络设备和服务器的带宽、增加吞吐量、加强网络数据处理能力、提高网络的灵活性和可用性。
$\qquad$负载均衡(Load Balance)其意思就是分摊到多个操作单元上进行执行,例如 Web 服务器、FTP 服务器、企业关键应用服务器和其它关键任务服务器等,从而共同完成工作任务。

  • 在 Nginx 中可以配置 weight(权重),默认为1
Code
1
2
3
4
5
6
7
8
# 第一步:配置上升流[狗头]
upstream tomcat-blog {
# server [ip]:[port];
server 192.168.2.100:80 weight=2;
server 192.168.2.101:80;
server 192.168.2.102:8080;
server 192.168.2.102:8081;
}

Nginx 实现动静分离

概述

$\qquad$Nginx 动静分离是指将动态请求与静态请求分离开,即 使用 Nginx 处理静态页面,Tomcat 处理动态页面。

$\qquad$动静分离有两种实现方式:
$\qquad$(1). 纯粹地把静态文件独立成单独的域名,放在独立的服务器上,也是目前主流推崇的方案
$\qquad$(2). 把动态与静态文件混合在一起发布,通过 Nginx 来分开
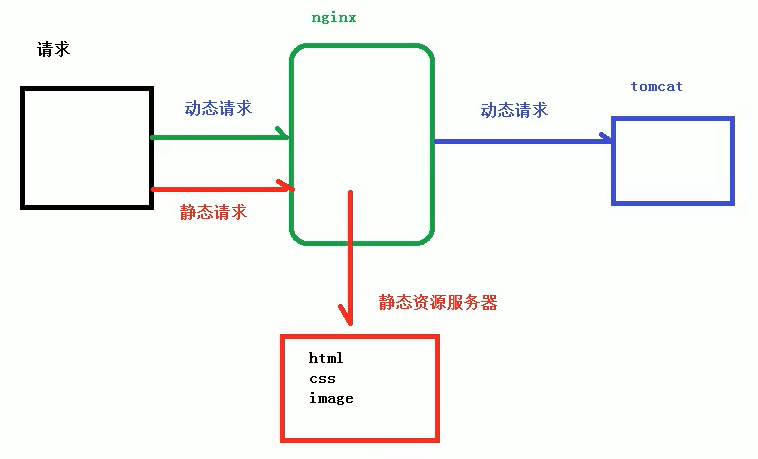
Nginx实现动静分离

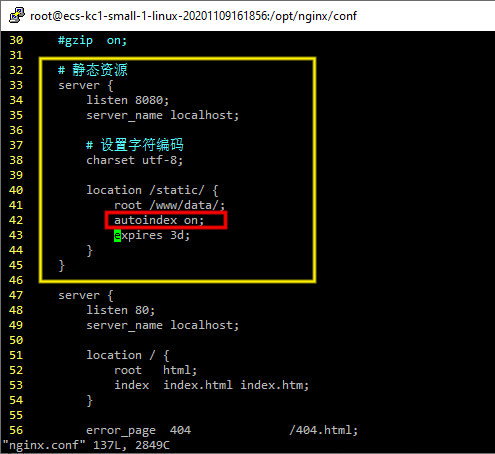
$\qquad$通过 location 指定不同的后缀名实现不同的请求转发。通过 expires 参数设置,可以使存过期时间,减少与服务器之前的请求和流量。

$\qquad$具体 Expires 定义:是给一个资源设定一个过期时间,也就是说无需去服务端验证,直接通过浏览器自身确认是否过期即可,所以不会产生额外的流量。

$\qquad$此种方法非常适合不经常变动的资源。(如果经常更新的文件,不建议使用 Expires 来缓存),比如这里设置 3d,表示在这 3 天之内访问这个 URL,发送一个请求,比对服务器该文件最后更新时间没有变化,则不会从服务器抓取,返回状态码 304;如果有修改,则直接从服务器重新下载,返回状态码 200。

实例

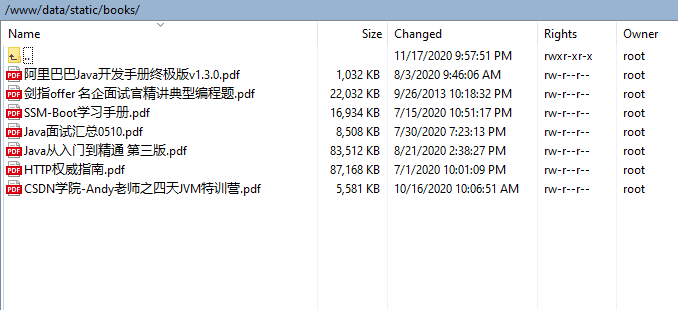
  1. 放置静态资源

将放置的静态资源

  1. 修改 Nginx 的配置文件 conf/nginx.conf

索引方式的配置

  1. linux 中重新加载 Nginx 的配置文件 —— ./nginx -s reload

  2. 在浏览器中测试

静态资源测试

文章作者: Amor-Joo
文章链接: https://cutealien.cn/2020/11/17/Nginx-learning-note/
版权声明: 本博客所有文章除特别声明外,均采用 CC BY-NC-SA 4.0 许可协议。转载请注明来自 Cutealien
打赏
  • 微信
    微信
  • 支付宝
    支付宝

评论